
코딩하는 해맑은 거북이
[PyTorch] PyTorch 구조1 본문
본 게시물의 내용은 '부스트캠프 AI Tech - PyTorch(최성철)' 강의를 듣고 작성하였다.
해당 글은 아래의 2가지를 다룬다.
1. AutoGrad & Optimizer
▶ Layer = Block
▶ torch.nn.Module
▶ nn.Parameter
▶ Backward
▶ Backward from the scratch
2. PyTorch datasets & dataloaders
▶ Dataset 클래스
▶ DataLoader 클래스
1. AutoGrad & Optimizer
- 레고의 Block 같이 하나하나 쌓아서 다음으로 넘긴다.
- layer들을 합쳐서 하나의 큰 block을 만드는 layer도 존재한다.
즉, 블록 반복의 연속이다.
ex1) Transformer 모델
(왼: Encoder Layer, 오:Decoder Layer)

ex2) ResNet
- 딥러닝을 구성하는 Layer의 base class
- Input, Output, Forward, Backward 정의
- 학습의 대상이 되는 parameter(tensor) 정의
- Tensor 객체의 상속 객체
- nn.Module 내에 attribute가 될 때는 required_grad=True 로 지정되어 학습 대상이 되는 Tensor
- 우리가 직접 지정할 일 은 잘 없음 (대부분의 layer에는 weights 값들이 지정되어 있음)
import torch
from torch import nn
from torch import Tensor
class MyLiner(nn.Module):
def __init__(self, in_features, out_features, bias=True):
super().__init__()
self.in_features = in_features
self.out_features = out_features
self.weights = nn.Parameter(
torch.randn(in_features, out_features))
self.bias = nn.Parameter(torch.randn(out_features))
def forward(self, x : Tensor):
return x @ self.weights + self.biasx = torch.randn(5, 7) # data : 5개, feature : 7개xlayer = MyLiner(7, 12) # 7개 feature -> 12개 feature
layer(x).shape
for value in layer.parameters():  # 랜덤하게 설정된 Parameter들 = weights
    print(value)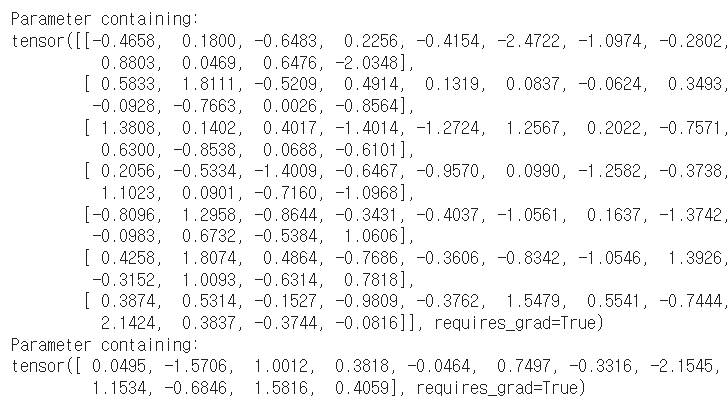
* nn.Parameter -> Tensor로 변경하면?
class MyLiner(nn.Module):
    def __init__(self, in_features, out_features, bias=True):
        super().__init__()
        self.in_features = in_features
        self.out_features = out_features

        self.weights = Tensor(      # Tensor로 설정하면?
                torch.randn(in_features, out_features))

        self.bias = Tensor(torch.randn(out_features))

    def forward(self, x : Tensor):
        return x @ self.weights + self.bias


layer = MyLiner(7, 12)
layer(x).shape
for value in layer.parameters():  # Parameter가 출력되지 않는다!
    print(value)
# 이유:Parameter는 미분의 대상이 되는 것만 보여줄 수 있기 때문에
# backward propagation의 대상이 되는 것들을 제외한 값들은 출현하지 않는다.
(출력값 없음!)
- Layer에 있는 Parameter들의 미분을 수행
- Forward의 결과값 (model의 output=예측치)과 실제값간의 차이(loss) 에 대해 미분을 수행
- 해당 값으로 Parameter 업데이트
for epoch in range(epochs):
    # Converting inputs and labels to Variable
    if torch.cuda.is_available():
        inputs = Variable(torch.from_numpy(x_train).cuda())
        labels = Variable(torch.from_numpy(y_train).cuda())
    else:
        inputs = Variable(torch.from_numpy(x_train))
        labels = Variable(torch.from_numpy(y_train))

    # Clear gradient buffers because we don't want any gradient ~
    # from previous epoch to carry forward, dont want to cummulate gradients
    # 이전의 gradient 값이 지금의 학습에서 영향을 주지 않도록 하기 위함
    optimizer.zero_grad()               # 1단계

    # get output from the model, given the inputs
    # hat(y)
    outputs = model(inputs)

    # get loss for the predicted output
    # hat(y)와 y의 loss 값
    loss = criterion(outputs, labels)   # 2단계
    print(loss)
    # get gradients w.r.t to parameters
    loss.backward()                     # 3단계

    # update parameters
    optimizer.step()                    # 4단계

    # 학습을 위해선 위와 같은 4단계 과정을 꼭 거쳐야한다.
    print('epoch {}, loss {}'.format(epoch, loss.item()))
- 실제 backward는 Module단계에서 직접 지정가능 (그러나, AutoGrad가 알아서 하기때문에 직접 지정할필요가 없음)
- Module에서 backward와 optimizer 오버라이딩
- 사용자가 직접 미분 수식을 써야하는 부담
→ 쓸 일은 없으나 순서를 이해할 필요는 있음
class LR(nn.Module):
def __init__(self, dim, lr=torch.scalar_tensor(0.01)):
super(LR, self).__init__()
# intialize parameters
self.w = torch.zeros(dim, 1, dtype=torch.float).to(device)
self.b = torch.scalar_tensor(0).to(device)
self.grads = {"dw": torch.zeros(dim, 1, dtype=torch.float).to(device),
"db": torch.scalar_tensor(0).to(device)}
self.lr = lr.to(device)
# hat(y)
def forward(self, x):
## compute forward
z = torch.mm(self.w.T, x) + self.b
a = self.sigmoid(z)
return a
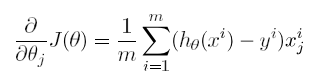
def sigmoid(self, z):
return 1/(1 + torch.exp(-z))
# 미분
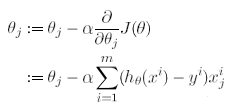
def backward(self, x, yhat, y):
## compute backward
self.grads["dw"] = (1/x.shape[1]) * torch.mm(x, (yhat - y).T)
self.grads["db"] = (1/x.shape[1]) * torch.sum(yhat - y)
# 미분값 만큼 업데이트해주는 함수
def optimize(self):
## optimization step
self.w = self.w - self.lr * self.grads["dw"]
self.b = self.b - self.lr * self.grads["db"]
## utility functions
def loss(yhat, y):
m = y.size()[1]
return -(1/m)* torch.sum(y*torch.log(yhat) + (1 - y)* torch.log(1-yhat))
2. PyTorch datasets & dataloaders
- 데이터 입력 형태를 정의하는 클래스
- 데이터를 입력하는 방식의 표준화
- Image, Text, Audio 등에 따른 다른 입력정의
* Dataset 클래스 생성시 유의점
- 데이터 형태에 따라 각 함수를 다르게 정의함
- 모든 것을 데이터 생성 시점에 처리할 필요는 없음
→ image의 Tensor 변화는 학습에 필요한 시점에 변환
- 데이터 셋에 대한 표준화된 처리방법 제공 필요
→ 후속 연구자 또는 동료에게는 빛과 같은 존재
- 최근에는 HuggingFace 등 표준화된 라이브러리 사용
- Data의 Batch를 생성해주는 클래스
- 학습직전 (GPU feed전) 데이터의 변환을 책임
- Tensor로 변환 + Batch 처리가 메인 업무
- 병렬적인 데이터 전처리 코드의 고민 필요
* DataLoader 파라미터별 설명
DataLoader(dataset, batch_size=1, shuffle=False, sampler=None, batch_sampler=None, num_workers=0, collate_fn=None, pin_memory=False, drop_last=False, timeout=0, worker_init_fn=None, * , prefetch_factor=2, persistent_workers=False)
https://subinium.github.io/pytorch-dataloader/
[Pytorch] DataLoader parameter별 용도
pytorch reference 문서를 다 외우면 얼마나 편할까!!
subinium.github.io
'Python > Tensorflow | PyTorch' 카테고리의 다른 글
| [PyTorch] 사칙연산 (0) | 2023.03.17 |
|---|---|
| [PyTorch] PyTorch 활용하기 (0) | 2023.03.16 |
| [PyTorch] PyTorch 구조2 (0) | 2023.03.15 |
| [PyTorch] PyTorch 기본 (0) | 2023.03.13 |
| [Tensorflow] Tensorflow 정의 및 동작 방식 (0) | 2021.03.19 |

